Back in 2013 I had an opportunity to drive across the US from Chicago to Los Angeles in good company. I was expecting a once in a lifetime trip and I wanted to document it properly. Since I knew I'd be mostly in charge of driving I wouldn't be able to watch the scenery change slowly and take pictures. Little did I know we'd go back the following year to drive from Denver to Seattle... Dashcams weren't as common back then and they lacked (and still do) some of the functionality that I ended up wanting so I ended up rolling my own solution as I wanted to have both the images and some maps etc. to show where the image was taken. I figured I could use a Gopro cam and mount it on the dashboard and set it up to take photos every 30 seconds while simultaneously logging our route with a GPS. The purpose of this page is to give readers an idea on how I pieced together the GPS data and photos, and some tips and caveats in case someone is planning to do the same.
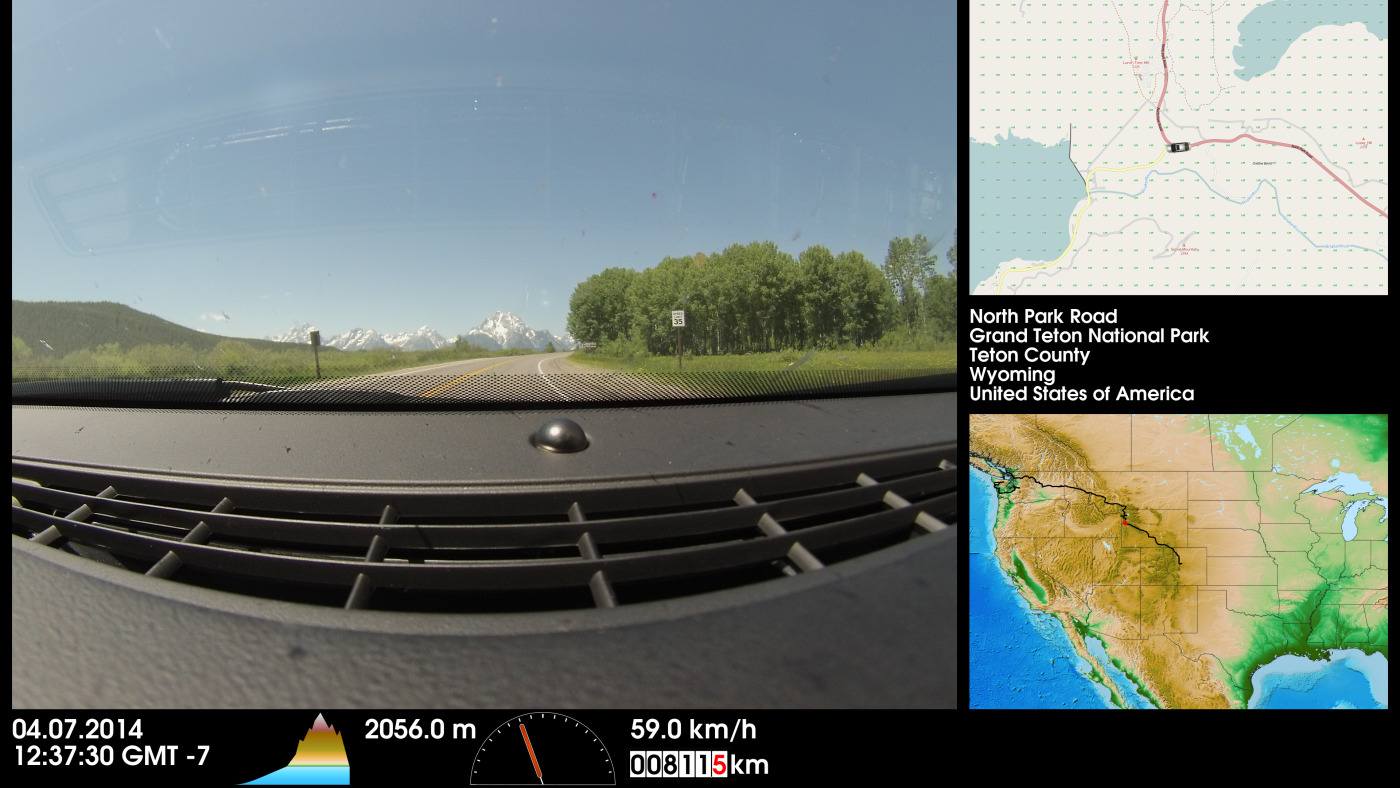
Dashcam image amended with GPS data, and generated maps.
Prerequisites
You need to have some programming skills to pull this off. I'm not going to release all of my scripts. First of all, they probably wouldn't work as your gps data is likely in a different format. Also, they are a complete mess and very inefficient, and I don't have the slightest ambition to repond to the "Sir, script xxx doesn't work please help" emails. I'm only releasing the ones that will pretty much work for everyone. If your programming skills are like mine i.e. search stackoverflow.com for code snippets and modify them to suit your needs you'll do just fine but you should note that this will take days (or more likely weeks). If you can't program, I'd say it is not worth trying to use GPS data but to create a movie of the captured photos instead and forget GPS data (but save it - you never know if you'll need it).
Equipment you'll need to have in the car
You will need need the following equipment:
- A dashcam that can be programmed to capture photos at 10-30 second intervals.
- A GPS unit / navigator with logging capacity or a dashcam with a built in GPS that saves GPS data in a separate file instead of burning it into photos.
- A good adjustable mount for the dashcam.
Set up
Essentially there are five things you must remember:
- Ensure your camera is synced to GPS time. This is very important. Otherwise you'll end up having to adjust timestamps manually, and I can tell you it is no fun.
- It is really important to mount your camera so that it sees as much of the road as possible. If your camera has a built in screen, use it. As you can see in the image above I didn't and ended up with 40% of the image area occupied by dashboard on our second trip. There is no way to fix this afterwards so take your time. This is also why you should have an adjustable mount.
- If your system is manual remember to switch it on every time you start driving. This was my mantra and I only forgot it once for a short drive in Yellowstone.
- Ensure that your GPS and dashcam are powered (and don't forget to unplug them so you don't drain the battery).
- Wash your windscreen properly every day.
That's it really. I'd recommend you to also back up both GPS and dashcam data, and ensure you won't run out of storage space. I'd also recommend you to capture images at 10 second intervals rather than once a minute. Memory cards are cheap so no need to skimp out on them. You should also choose a dashcam that produces at least 5 megapixel images if you're aiming for 4k resolution with the end product.
Data processing
First stage - the easy bit
Now that you have returned back home with a few memory cards full of data it is time to process the files. This stage is relatively easy and takes a day or so depending on programming skills.
- First and probably the easiest step is to extract timestamps from image files and save them. I used jhead command on Ubuntu, looped all jpgs and saved timestamps to imagefilename.txt.
- Second step is to extract coordinates and timestamps from GPS data. If you used a logger you probably have a text file with timestamps/coordinates. I had a Garmin navigator that saved to a gpx file that was relatively easy to parse. I ended up noting that for some reason timestamps were not in chronological order and there were duplicates. I sorted the data and eliminated duplicates with Libreoffice. If you have speed, direction and elevation data as well, make sure to save them as well.
- Third step is to find the closest gps point for each image by comparing GPS and image timestamps. Brute force is your friend unless you're in a hurry or go for more elegant solutions. I ended up creating a file ("good_coordinates") that contains a GPS timestamp, latitude, longitude, speed, elevation, direction, timestamp of image and path to image for each of the images that I captured. I used a threshold of +- 10 seconds for match. If there weren't GPS points within that range, I saved timestamps and paths of those images into another file ("bad_coordinates").
Second stage - now it gets more complicated
So the first stage was easy. Now you'll have to start processing GPS data into map tiles and transform coordinates into addresses. I recommend you to set up your own tile server. It will take some time and effort but it beats scraping thousands of tiles. There are good instructions for setting up a tile server at Switch2OSM webpage. You'll also need to grab tile packages. Geofabrik has sub-region extracts. Don't even think about grabbing the planet set and set up a tile server that covers entire enitre planet unless you really know what you're getting yourself into and have enough storage space and memory. I ended up having four separate tile servers (including four separate instances of postgres) each of them serving tiles from separate data sets. If you have enough storage space and memory, I highly recommend using as subset as possible in order to avoid having several instances.
I suppose you could set up Nominatim to reverse coordinates into addresses, but I never got it working as I always ran out of either memory or storage space. I opted to use Mapquest's API. That took a week or so as I did 4 requests per minute out of courtesy, and I wasn't in a hurry.
On Ubuntu 20.04 with postgres 12 I used the following commands to create tile servers. Just install any dependencies you're complained about. If you create more than one tile server remember to change DBNAME and PORT (default=5433) to create separate carto stylesheets for each tile server (i.e. change PORT and DBNAME). You'll either have to run these as root or postgres - depends on your configs.
cd /var/lib/postgresql/12
mkdir DBNAME
sudo chown postgres:postgres DBNAME -R
At least the first to rows must be run as user postgres. Ensure postgres and www-data can write to datadir.
/usr/lib/postgresql/12/bin/initdb -D /var/lib/postgresql/DBNAME
pg_createcluster --datadir=/XXX/xxxx/DBNAME/ 12 DBNAME
service postgresql restart
pg_ctlcluster 12 DBNAME start
Check out help section of osm2pgsql especially re: -C parameter and change osm.pbf file name. Depending on your osm.pbf file, computer specs and the resources you allocate this will take anything from minutes to days. My 5 year old Dell laptop populates e.g. the US West database in approximately 90 minutes.
createdb DBNAME -p PORT
psql -p PORT -d DBNAME -c 'CREATE EXTENSION postgis; CREATE EXTENSION hstore;'
osm2pgsql -c -s -C 2500 -P PORT -d DBNAME /pathto/us-west-latest.osm.pbf
If you can't generate tiles run the following as postgres user in postgres databases.
GRANT ALL on geometry_columns TO "www-data";
GRANT ALL ON SCHEMA PUBLIC TO "www-data";
GRANT ALL on spatial_ref_sys TO "www-data";
GRANT ALL on planet_osm_line TO "www-data";
GRANT ALL on planet_osm_nodes TO "www-data";
GRANT ALL on planet_osm_point TO "www-data";
GRANT ALL on planet_osm_rels TO "www-data";
GRANT ALL on planet_osm_roads TO "www-data";
GRANT ALL on planet_osm_ways TO "www-data";
GRANT ALL on planet_osm_polygon TO "www-data";
- Fourth step is to convert all coordinates from "good_coordinates" into addresses. Make sure to save them!
- Fifth step is to generate tiles for each line in "good_coordinates". Note that you must choose a zoom level and ensure you also generate a sufficient number of tiles to the north, east, south and west of central coordinate depending on how large you want your "GPS map" to be. Tiles don't really take that much space so you'll probably want 3-4 extra tiles to each direction. Number depends on how large you want your minimap to be. I used 14 as zoom level. I first tried with 12 but it was to large scale. 14 is a pretty good compromise. If you use e.g. regional subsets of the US make sure to specify in your script that e.g. anything west of XX.XXXE is US_West while while east of that is US_Midwest. I used a modified version of Mapnik's generate_tiles_xy.py script to generate tiles.
- Sixth step is to generate a large scale topographic map. I created mine using QGIS and NASA data, but I'm sure there are easier alternatives. The main point is that you must know extents of the map and the map must be in orthograpic projection. It won't be perfect but good enough considering that it's a large scale map and relatively low resolution.
Putting it all together
Now that you have married your images with location data, and you've generated map tiles and reversed coordinates into addresses it is time to put it all together. I used mainly Imagemagick.
- Seventh step is to generate composites of "good_coordinates". This means creating a composite background map using tiles (imagemagick's montage command is great, make sure to center the map to GPS coordinates), overlaying an image of a car or something similar to the map and orienting it based on GPS data. Then you do the same to the topographic map except you probably want to use a point or some other shape. BTW: I created a black "path" of the entire trip and I overlaid a red dot over that path to show how far we were. Then it is just a matter of including the photo and other relevant information such as address, distance, speed, odometer, elevation etc.
- Eight step is to create composites of "bad_coordinates". Essentially it is the same as above except you omit any GPS related steps.
- Final step is to put everything together into a movie. Mencoder works great for this. For example
mencoder "mf://*.jpg" -nosound -of lavf -lavfopts format=mp4 -ovc x264 -x264encopts crf=18 -o movie.mp4 -mf type=jpg:fps=3